Getting Started
So you've just got your hands on a transform.engine - congratulations!!
Now, let's get you up and running.
This page will hopefully get you up and running as soon as possible; we've kept it lean on purpose. For more detailed information regarding all things transform.engine, please take a deep dive into our manual, which you can find in the sidebar on the left.
Step 1: Unpack the cardboard box
The fun bit! Carefully unpack your transform.engine from the box. In the box, you will find:
- a transform.engine
- an IEC power lead
- a safety information document
If you are missing any of the above - please get in touch with your supplier and they will be able to help. Be sure to read diligently the important information in the safety instructions!
Step 2: Plug it in
Start by plugging in the network connections to a Dante network. To see some of the various options for network configuration, check out our handy manual page here.
Next, take your IEC cable and plug it into the transform.engine, and turn the power switch on. Wait for the engine to start: this may take a couple of minutes.
Step 3: Configure the IP address(es) of the transform.engine
For the purposes of this getting started guide, we will assume it is a fairly simple setup, consisting of 1x transform.engine, 1x Dante enabled audio mixing console, and 1x personal computer to run the transform.client on.
Using the screen on the front of the transform.engine and the encoder, press the encoder once to enter the menu, and then select 'IP Config'.
From there, you are able to set your desired IP Address configuration.
Please bear in mind that we will use example IP addresses below, but please configure the IP addresses as you need.
Example transform.engine IP addresses:
Primary
- Mode:
Static - IP:
192.168.1.100 - Subnet Prefix:
/24(equivalent to255.255.255.0)
Secondary (optional)
- Mode:
Static - IP:
192.168.2.100 - Subnet Prefix:
/24(equivalent to255.255.255.0)
Control
- Mode:
Static - IP:
192.168.3.100 - Subnet Prefix:
/24(equivalent to255.255.255.0)
Example Dante enabled audio mixing console IP addresses
In a DiGiCo environment, this would be the IP address of your DMI-Dante card, not your console ethernet port!
Primary
- Mode:
Static - IP:
192.168.1.50 - Subnet:
255.255.255.0(equivalent to/24) - Gateway:
N/A
Secondary (optional)
- Mode:
Static - IP:
192.168.2.50 - Subnet:
255.255.255.0(equivalent to/24) - Gateway:
N/A
Example Personal Computer (wired connection) IP address
- Mode:
Static - IP:
192.168.1.200(this is for Dante patching and will change when connecting through the transform.client) - Subnet:
255.255.255.0(equivalent to/24)
In order for the audio engine to start (enabling you to install, open and plugins), the 'Primary' network socket must be connected to another device, and show a green light on the back of the unit.
Step 4: Dante Patching and Clocking
Patching
At this point, we need to patch the Dante subscriptions between your transform.engine and audio console.
Plug the primary port of your transform.engine, the primary port of your Dante enabled audio console, and your personal computer all into a network switch.
If you haven’t already, download Dante Controller here and install it onto your personal computer.
Launch Dante Controller. Your transform.engine and audio console will magically appear!
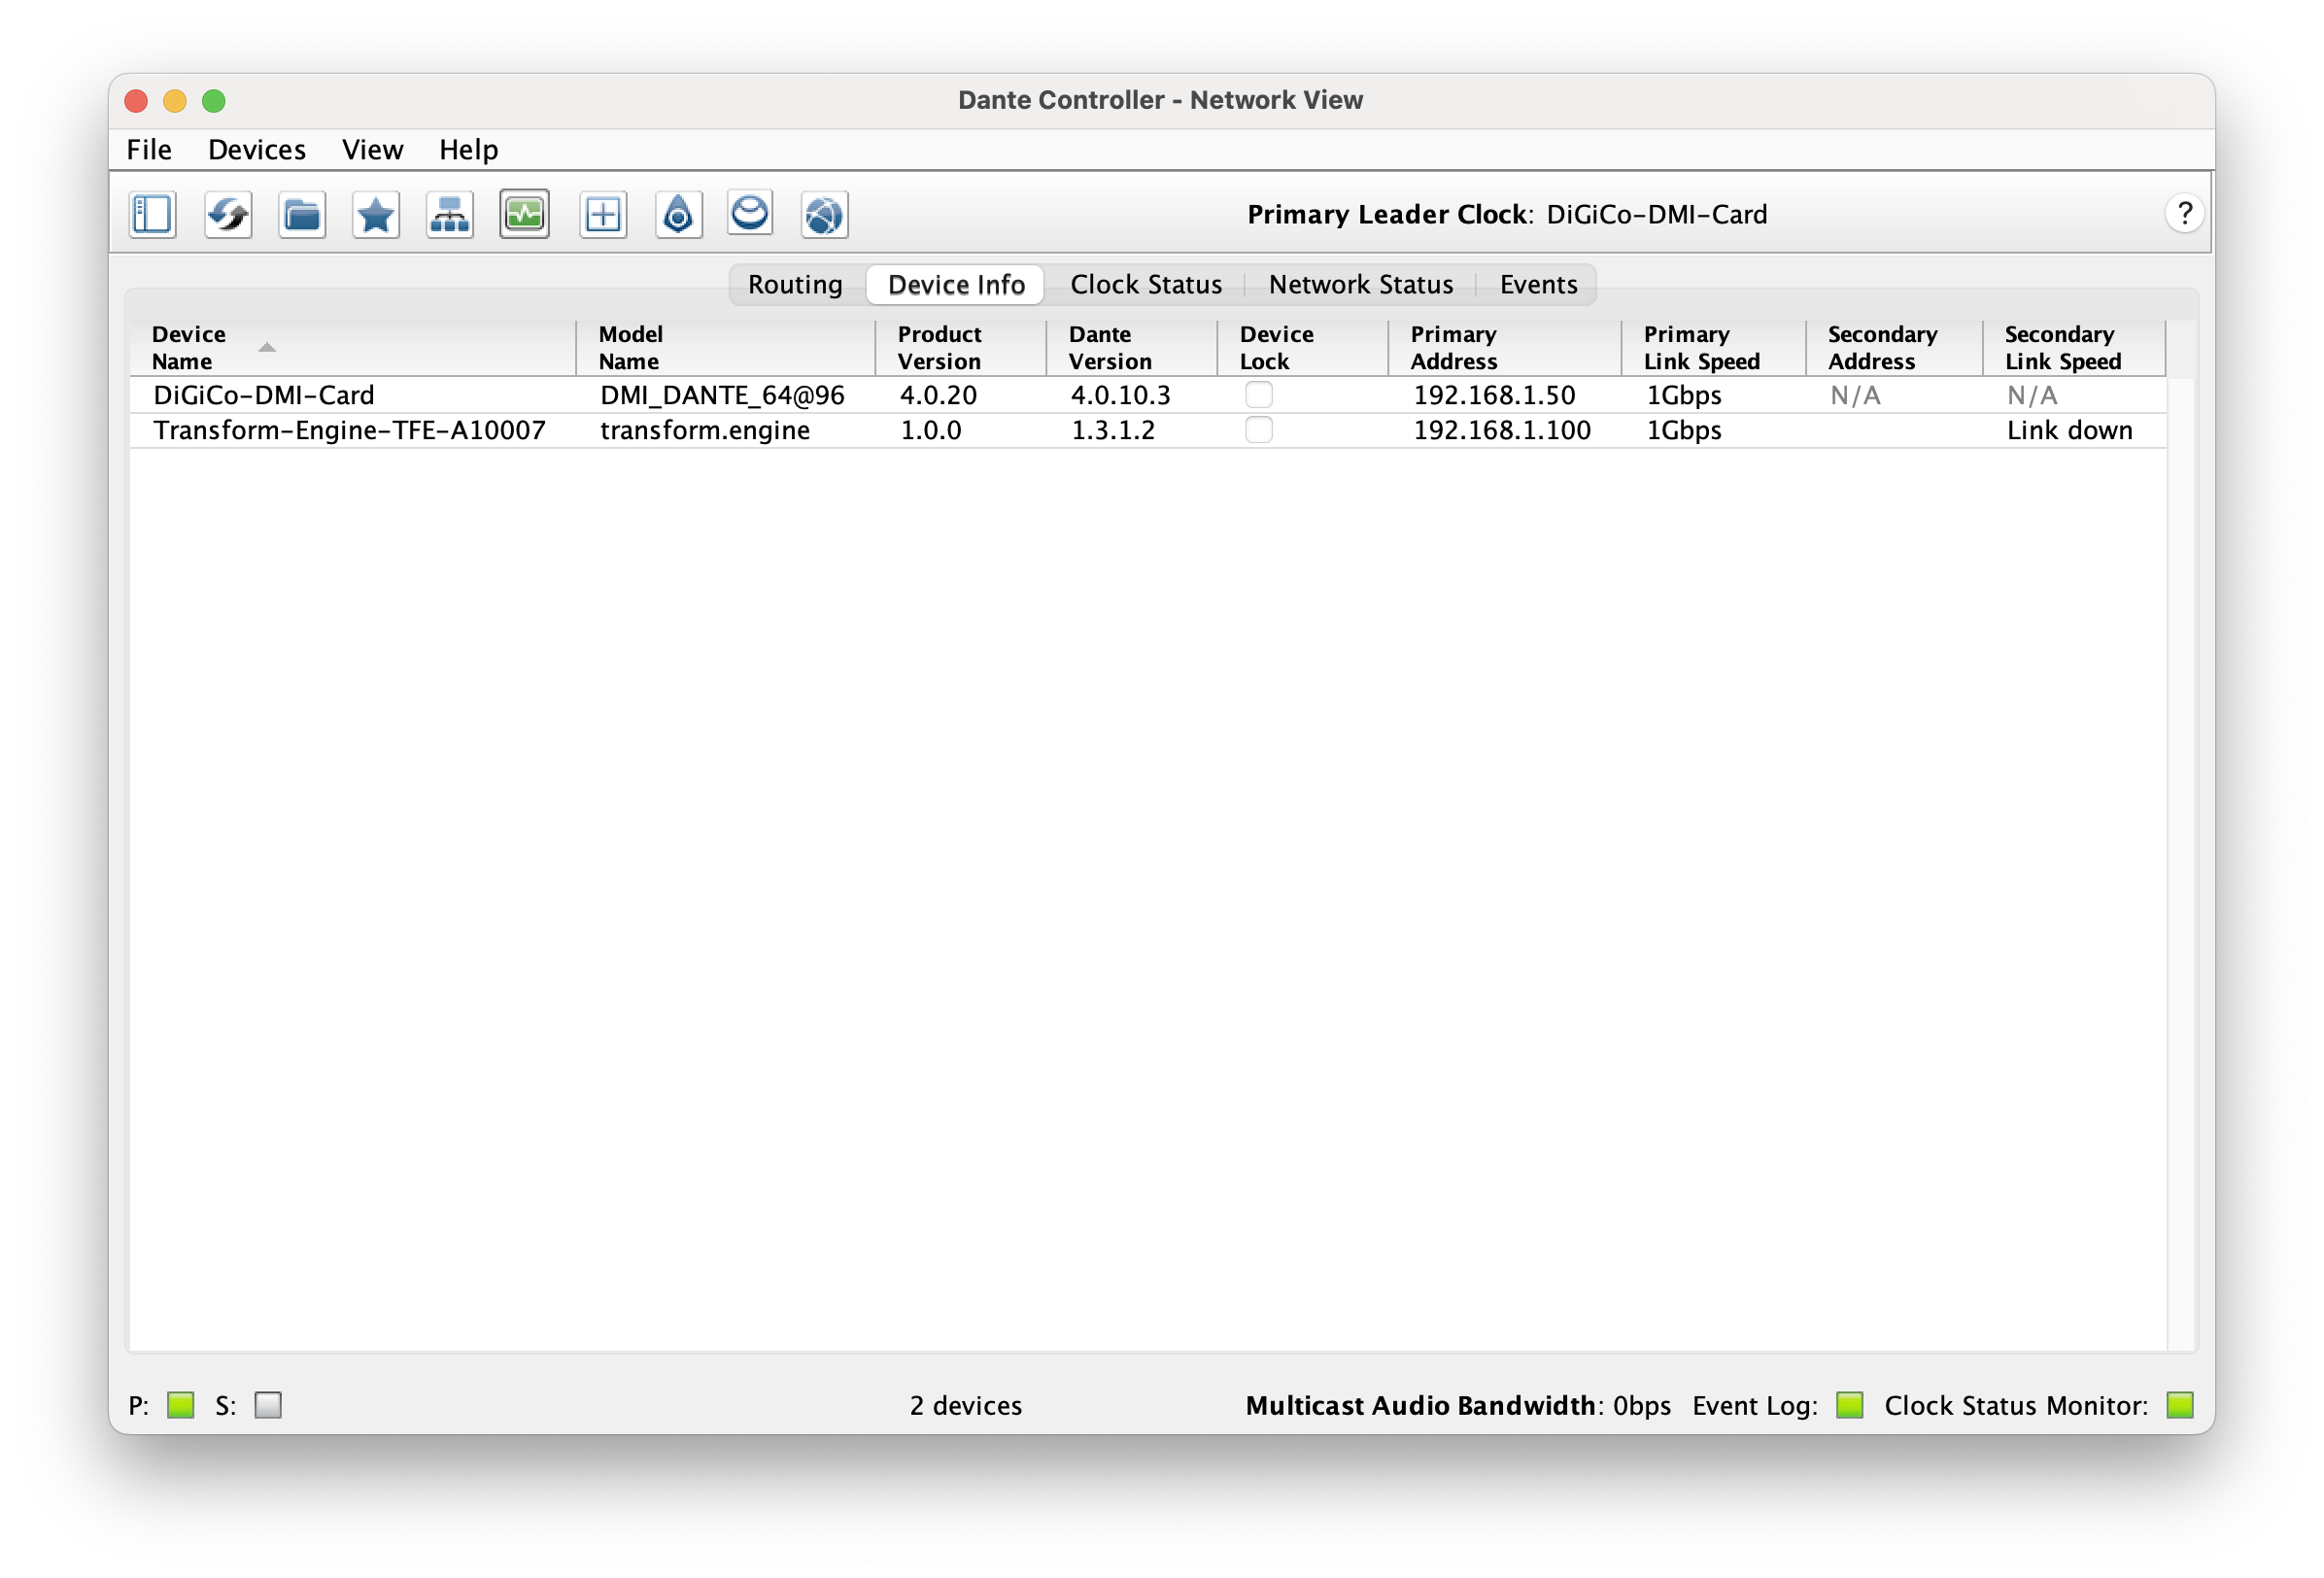
Patch all 64 transmit channels (fancy networking term for outputs) from one device to the other device’s receive channels (similarly fancy networking term for inputs), and vice versa.
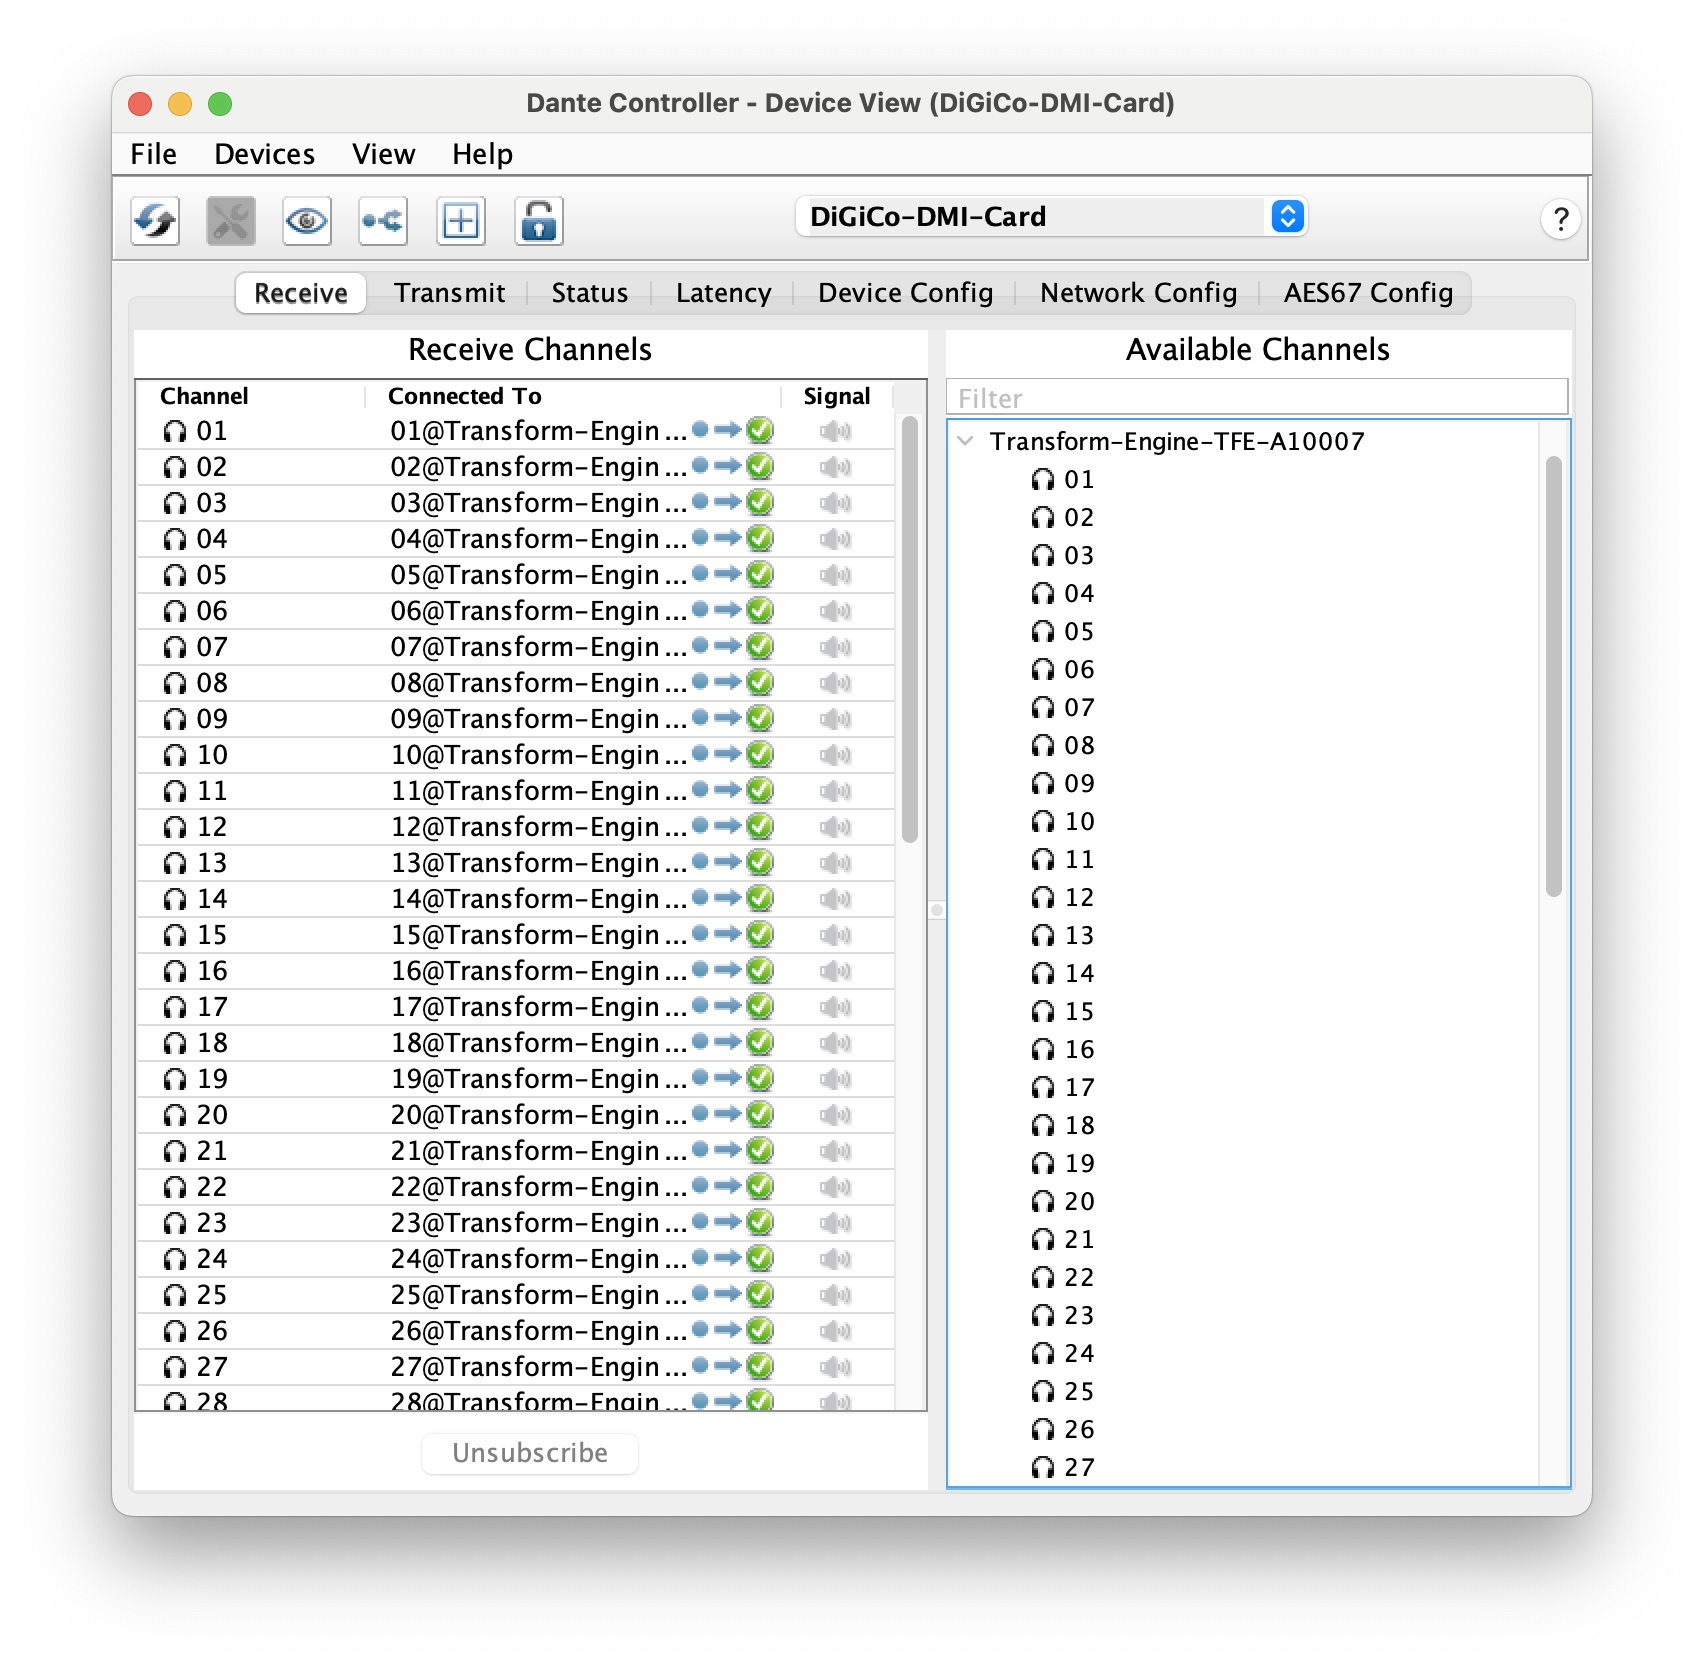
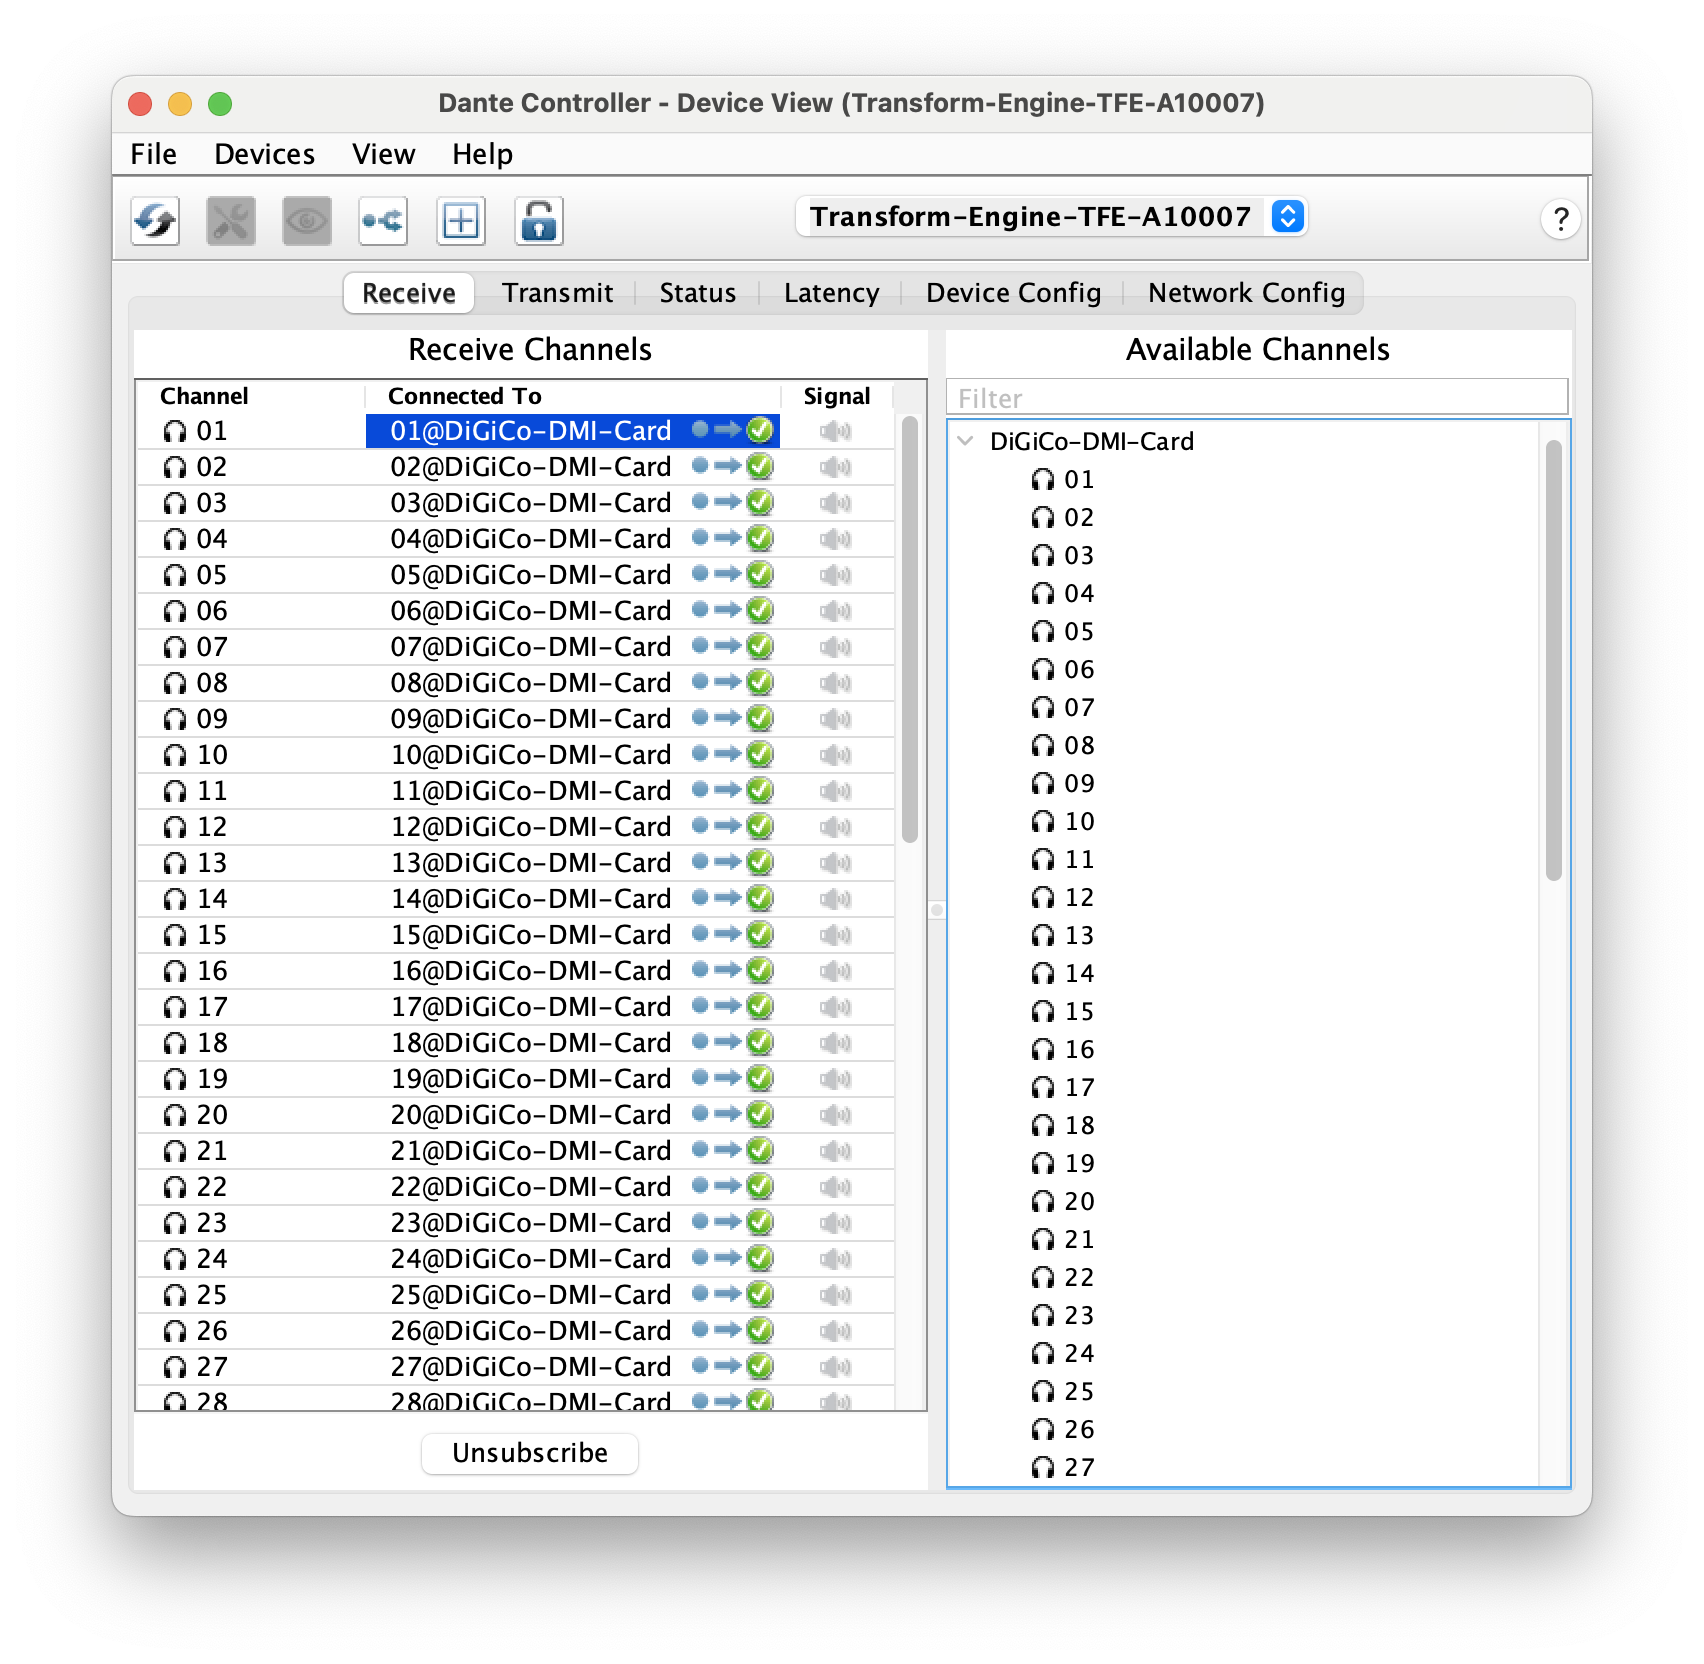
Your devices will now be patched 1 to 1!
Clocking
Whilst Dante is very clever, ensuring your clock settings are correct are vital for crystal clear audio.
Dante will automatically select a clock leader, but if for example you are using a DiGiCo console, and the console is set to anything other than the DMI-Dante card as the sync primary, you will need to ensure your DMI-Dante card takes its sync from the console. To do this, in Dante controller, under clock status, you need to tick the 'Preferred Leader' box and 'Enable Sync to External' on your DMI-Dante card.
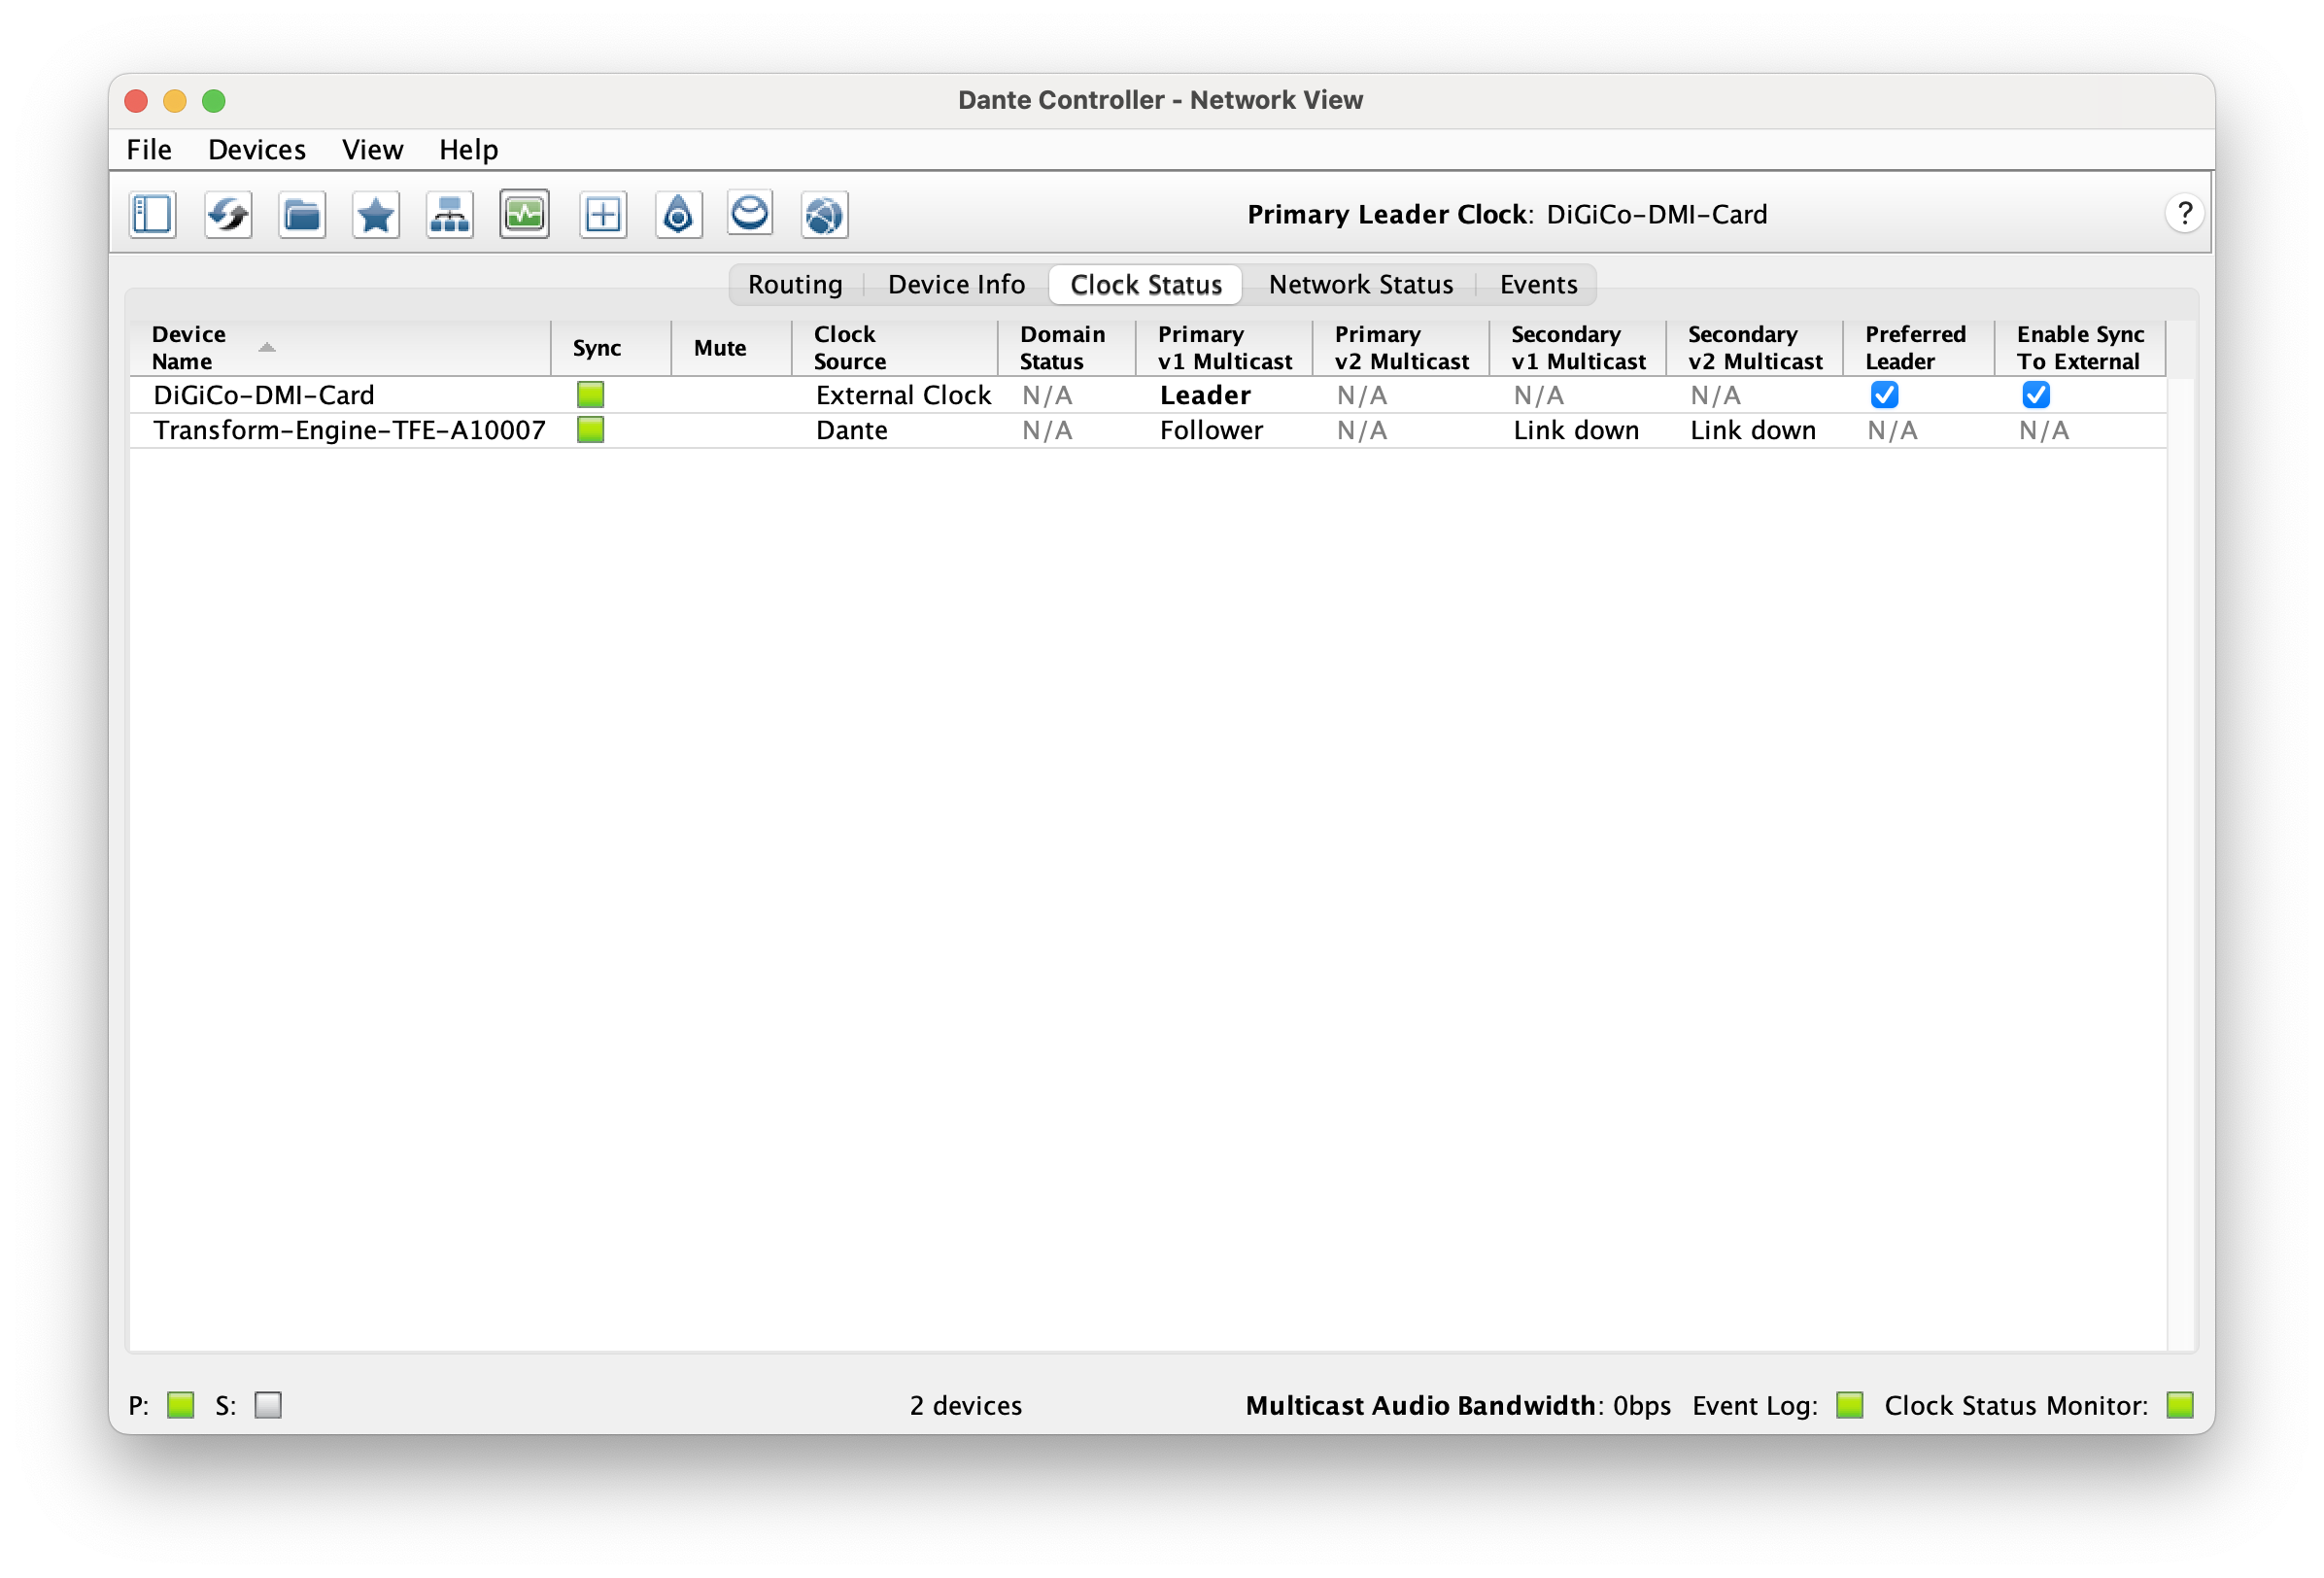
This means your Dante network will be clocking from your console sync. If you don't do this, your console and Dante network will be running to different clocks and could lead to potential problems!
Once patching and clocking is done, unplug the transform.engine, audio console and personal computer from the network switch. Plug the primary connection directly from transform.engine to the primary connection of the audio console (do the same for secondary if in use).
We are now ready for audio; let’s prep transform.client!
Step 5: Setting up transform.client software
Download transform.client from our website here, and install it to your device.
Klaxon: the transform.client has the associated transform.engine firmware bundled into the software, hence you don’t need an additional firmware file. Wherever your transform.client software goes, the relevant firmware will be there too!
With your audio connections now patched and connected, plug a cable from the control port of the transform.engine to your personal computer. You will then need to edit the IP settings of your personal computer.
Current Personal Computer IP settings:
- Mode:
Static - IP:
192.168.1.200(this was for Dante patching) - Subnet:
255.255.255.0(equivalent to/24)
New Personal Computer IP Settings:
- Mode:
Static - IP:
192.168.3.200 - Subnet:
255.255.255.0(equivalent to/24)
Your personal computer and the control port of the transform.engine are now on the same subnet and will be able to talk to one another!
Launch transform.client! You’ll be presented with a window like this:
Select ‘Connect to new device’ and enter the IP address (in this case 192.168.3.100), hit enter, and voila!
Your transform.engine has been found, click the device and you’ll be ready to enter the new world of plugins, live.
Now for the really exciting bit. Getting going!!
Here's Elliot giving you a quick spin through the transform.client:
Step 6 (Potentially): Updating your transform.engine!
If your transform.engine is on the correct version already, you can skip straight to Step 7, or we’d recommend a quick tea break, a bike ride, and/ or learn to juggle.
However, if your transform.engine is on a different version to your transform.client, you will be forced to take action!
Second klaxon (and friendly reminder): the transform.client has the associated transform.engine firmware bundled into the software, hence you don’t need an extra file. Wherever your transform.client software goes, the relevant firmware will be there too!
When the transform.engine and transform.client are on incompatible versions, when selecting your transform.engine in the transform.client, it will launch directly to the ‘Software’ tab, do not pass go, do not collect £200.
At this point you will see the message ‘Upgrade to ??.??.?? (required)’ and you will be unable to do anything else. Select upgrade and it will do its thing. Once finished, you’ll be prompted to restart and your transform.engine will be firing on all cylinders in no time. This will ensure maximum performance and compatibility!
If you have any problems when upgrading - please don't hesitate to drop us an email at [email protected] and we'll get back to you ASAP.
Step 7: Installing Plugins
Now it's time to install your plugins!
Here's Elliot talking you through plugin installation.
To install plugins and licence some plugins on your transform.engine, you will need to install them in the Plugin Host (Windows 10 environment).
We will use a SSL plugin as an example below, we also have a range of walk through guides to installation and licensing on our website from various manufacturers, here.
Accessing the Plugin Host
- Open the Fourier Audio Transform client software.
- Select the transform.engine you would like to install the plugins onto.
- Once open, click the ‘Library’ tab, and select ‘Add/Remove Plugins’.
- A warning message will appear ‘This will stop the audio engine, are you sure you want to continue?’. If happy to proceed, select ‘Continue to Add/Remove Plugins’.
- Your installed plugins will appear in the list, to add more, select ‘Open plugin host’, this will take you to the virtualised Windows 10 environment.
Once in the Plugin Host, install plugins as you normally would on any Windows 10 system. Example of an SSL plugin below:
- After following the ‘Accessing Windows Environment’, you will be in a position to install plugins.
- On your personal device, download the desired plugin(s) for a Windows OS from the above link, it should be in a
.exefile format. - Copy this installer file to a USB stick.
- Plug it into any of the USB ports on the transform.engine.
- In the search bar, type ‘This PC’, it will find the ‘This PC’ app and hit enter.
- Locate your USB stick in the window and find your SSL installer file.
- Run the Application (
.exefile) for the desired plugin. - During the installation process, when asked which components to install, unselect AAX and VST.
- Install location does not need to be altered.
- Navigate through each menu, and once complete, click ‘Finish’.
- Repeat the process if you have further plugins to install.
Step 8: Showfiles and System
Here's Elliot talking you through showfile management and system status.
If you select the System tab, you will see 5 tabs on the right hand side.
- Showfiles- transform.engine automatically saves every change you make, immediately, but if you want to take your show file elsewhere, or copy it, you can do it here.
- System Status- an overview of the different components of your system. Key detail here is ‘Audio IO’, this will tell you if the audio engine is ‘Running’ and a spinning cog for visual feedback!
- Performance- a more detailed looked at the DSP load.
- Software- version numbers and log files!
- System Reset- proceed with extreme caution, delete all show files, and return the plugin host to its factory default (removes all installed plugins and any license files stored in the plugin host environment). Your box will be brand new! Remember: with great power, comes great responsibility.
For more detailed information, please see the System Status section of the manual.